When you want to remove embroidered patches, you choose fabric-safe methods that protect the garment, prevent color transfer, avoid fraying, and keep textures intact for repeated wear and frequent alterations. This guide covers how to replace embroidered patches and refresh the design while preserving textile integrity, whether you are reviving a favorite jacket, bag, or denim piece that deserves a cleaner look. You will learn about fabric-safe patch removal, including both iron-on and sew-on types, with tips on temperature control, residue avoidance, and testing techniques on hidden areas before you commit. Learn how to remove iron-on patches safely, avoiding scorching, residue, or fiber damage, and then tackle sew-on designs with careful seam-work, lifting threads gradually for a durable, clean result. It also explains how to sew on patches for a permanent finish and helps you refine your technique for long-lasting wear, so your wardrobe remains versatile without sacrificing fabric quality.
From a terminology perspective, the same task can be described as patch detachment, patch removal, or patch swapping to suit new aesthetics. Other common phrasings include garment embellishment removal and fabric-safe design refresh, both signaling the goal of preserving fibers while changing decoration. Related terms such as fabric-safe backing removal, heat-activated adhesive release, stitch-free patch removal, and controlled residue cleanup reflect the practical steps behind the process. You will encounter phrases like replacing patches, swapping designs, and reapplying new patches, which capture the concept through different search intents. Using these related concepts helps content serve readers and rank for queries about removing and replacing patches on a variety of fabrics.
Remove Embroidered Patches: Fabric-Safe Steps to Remove Patches (remove embroidered patches)
Removing embroidered patches can be done without harming the fabric when you choose fabric-safe patch removal techniques and proceed slowly. Begin by identifying the patch type and testing any solvent or heat method on a hidden area to gauge colorfastness. This approach helps you preserve texture, color, and the garment’s wearability while you work toward a clean edge.
With the right prep, you can minimize damage and prepare the area for a new patch. Use gentle tools and controlled motion, especially around delicate fabrics, and keep the garment flat and supported throughout the process. This mindset applies whether you’re removing a small decorative patch or a larger applique, ensuring you remove embroidered patches while protecting the fabric’s integrity.
How to Remove Iron-On Patches: A Fabric-Safe Approach
Iron-on patches rely on heat-activated adhesive, so the key is to soften the glue without scorching fibers. Start with a protective barrier like a pressing cloth and use a low-to-medium heat source, such as a hair dryer, held a small distance from the patch. This fabric-safe approach minimizes heat exposure while enabling gradual release of the patch.
Once the edge loosens, lift slowly with a seam ripper or plastic card to avoid tearing. After removal, address any adhesive residue with rubbing alcohol or a gentle remover, then wash the area with mild detergent. This sequence aligns with best practices for fabric-safe patch removal and helps you prepare a clean surface for a new patch.
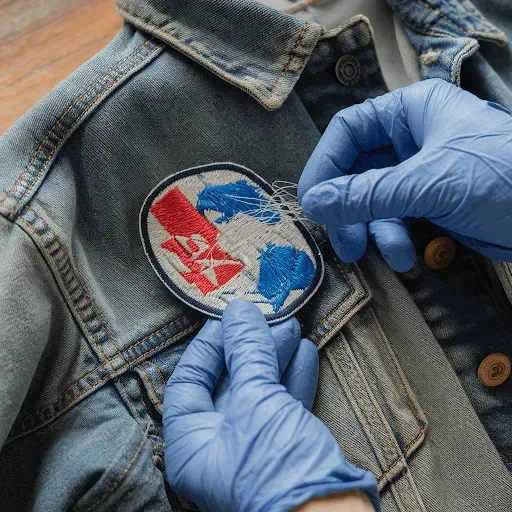
How to Remove Sew-On Patches Without Damaging Fabric
Sew-on patches are anchored by stitching, so the removal strategy focuses on cutting threads without harming the fabric. Begin by sliding a seam ripper under a stitch along the patch edge, lifting threads carefully in small sections. This careful, thread-first approach reduces the risk of fraying and keeps fibers intact.
As stitches come free, peel the patch away and use tweezers to manage stray threads. Clean the surface with a mild detergent and water, then air-dry. If you plan to sew on patches later, you’ll appreciate how this method complements tips on how to sew on patches, ensuring you can reattach with a neat, durable finish.
Replacing Patches: From Removal to Fresh Embellishment (replace embroidered patches)
After you’ve removed patches, the next step is choosing a new design that matches your garment’s color, texture, and style. Consider size, shape, backing type (iron-on vs sew-on), and compatibility with your fabric. Planning ahead helps prevent future adhesive or stitching issues and supports a lasting, stylish result.
Prepare the surface by ensuring it’s clean and dry, then position the new patch accurately. For iron-on patches, apply heat through a barrier and press firmly as directed; for sew-on patches, sew carefully with a tight stitch along the edge. By focusing on replacement steps, you can confidently replace embroidered patches with a durable, attractive design.
Tools, Safety, and Prep for Fabric-Safe Patch Removal
A well-rounded kit makes fabric-safe patch removal smoother. Gather a seam ripper, small scissors, tweezers, a clean cloth, mild detergent, rubbing alcohol or a gentle adhesive remover, a hair dryer or iron, and a pressing cloth or barrier. Always test any solvent on an inconspicuous area first to protect color and texture.
Safety and technique matter, especially on delicate fabrics like silk or velvet. Work in good lighting, keep the garment supported, and proceed in small sections to minimize stress. With the right tools and prep, you’ll reduce risk and improve the outcome of fabric-safe patch removal.
Troubleshooting, Aftercare, and Longevity of Your Patchwork (troubleshooting and aftercare)
Even with careful removal, some issues can arise, such as adhesive residue or patch edges lifting. If a patch won’t stick after replacement, re-press with a barrier cloth or reseat edges with appropriate stitching. For puckering or color transfer, choose a patch with compatible dyes and adjust placement or tension during application.
Post-application care extends durability. Turn garments inside out for gentle washing, avoid high heat in dryers, and inspect patches after washing. These steps reinforce longevity and align with practical guidelines for long-term success when removing and reapplying patches.
Frequently Asked Questions
How can I remove embroidered patches safely without damaging fabric?
Identify patch type (iron-on vs sew-on). For iron-on patches, protect the fabric with a cloth barrier, use a hair dryer on low heat, and gently lift the edge as the adhesive softens. For sew-on patches, use a seam ripper to pry under a stitch and lift the patch slowly. Remove thread remnants with tweezers, then clean the area with rubbing alcohol or a mild adhesive remover, rinse with water and a mild detergent, and air dry. Always test a hidden area first and prioritize fabric-safe patch removal to avoid discoloration or damage.
How to remove iron-on patches: what is the best method to preserve fabric?
To remove iron-on patches, protect the fabric with a pressing cloth, apply gentle heat with a hair dryer on low, and slowly lift the patch edge as the glue softens. If needed, use a thin plastic card to ease it away. blot away adhesive residue with rubbing alcohol or a fabric-safe adhesive remover, then wash with mild detergent and rinse. Test a hidden area first and avoid high heat to prevent scorching.
How to replace embroidered patches after removal?
Choose a patch that fits the space and fabric, and prepare the surface by cleaning and a light pre-press. For iron-on patches, position the patch, cover with a cloth barrier, apply heat at the recommended setting for 20–40 seconds, and let it cool before verifying the bond. For sew-on patches, pin or glue temporarily, stitch around the edge with a tight running or blanket stitch in a color-matching thread, finish with a knot, and press gently. Aftercare: wash inside-out on a gentle cycle and air dry; inspect edges and reattach if needed.
What is fabric-safe patch removal and how does it help when removing patches?
Fabric-safe patch removal means using gentle, tested methods to protect the fabric. Always test cleaners on a hidden area; use mild detergent, rubbing alcohol, or a gentle adhesive remover as appropriate; avoid harsh solvents on delicate fabrics. Rinse, wash per care instructions, and air dry. This approach preserves texture and color, ensuring a clean surface for a new patch.
How to sew on patches and how to remove embroidered patches?
To remove embroidered patches, use a seam ripper to lift stitches along the edge, remove row by row, peel the patch away, and use tweezers for any remaining threads. To sew on patches, position the patch, pin or glue temporarily, and stitch around the edge with a running, whip, or blanket stitch; finish with a knot and a light press. Choose thread color to match and consider reinforcement for heavier fabrics.
What steps should I take to remove embroidered patches and replace them with a new design?
First, remove the patches using the appropriate method (iron-on or sew-on). Clean the area and select a new patch that suits the fabric. Prepare the surface (clean and dry), then apply the new patch using heat and barrier cloth for iron-on patches or stitching for sew-on patches. Allow to set, then wash inside-out on a gentle cycle and air dry. Inspect adhesion and reattach if needed.
| Section | Key Points |
|---|---|
| Patch Types | Iron-on patches use heat-activated glue; sew-on patches are stitched. Removal strategies differ to protect fabric. |
| Tools & Safety | Seam ripper, small scissors, tweezers, cloth, mild detergent, rubbing alcohol or adhesive remover, heat source (hair dryer/iron), barrier cloth; test solvents on inconspicuous area; handle delicate fabrics with care. |
| Part 1: Remove Iron-On Patches | Protect fabric, apply controlled heat to soften glue, gradually lift patch, remove residue with alcohol/remover, wash and air dry; use gentle heat to avoid scorching. |
| Part 2: Remove Sew-On Patches | Open stitches with a seam ripper, cut/lift stitches in small sections, lift patch, remove remaining threads with tweezers, brush away loose fibers, wash surface. |
| Part 3: Residue & Adhesive | Test area with rubbing alcohol; blot with soapy warm water if needed; avoid harsh solvents; acetone only with caution and tests on hidden areas; wash garment afterward. |
| Part 4: Replacing Patches | Choosing patches (size, type, backing), prepare surface (clean, dry, pre-press), apply iron-on with pressing cloth and controlled heat; attach sew-on with stitching; aftercare: wash inside-out, air-dry, inspect edges. |
| Troubleshooting & Tips | If patch won’t stick, re-press; patch puckers, adjust size or tension; color transfer may require compatible dyes; test care instructions; on delicate fabrics favor sew-on; store patches flat. |
| Conclusion & Longevity | Practical skill to save garments and preserve fabric integrity by removing and replacing patches safely; follow fabric-safe methods and careful steps for removal and reapplication to keep items looking new. |
Summary
HTML table above summarizes key points from the base content about removing and replacing embroidered patches.