The process of making embroidered patches sits at the crossroads of art and engineering, turning a simple idea into a durable, wearable badge that communicates identity on jackets, hats, bags, and uniforms, while balancing cost, production speed, color fidelity, durability in washing, and colorfast performance across seasons, delivering consistent results that satisfy everyday wear. From concept to creation, patches extend beyond decoration, offering a powerful way to tell a story, build brand identity, and celebrate team spirit across communities, clubs, and organizations, while aligning with style and function, supplier partnerships, and sustainable materials considerations, across markets and demographics. A well-designed patch hinges on thoughtful patch embroidery design that considers size, shape, fabric, backing choice, and how it will be applied to jackets, hats, uniforms, or bags, in ways that maintain legibility after washing and abrasion, with attention to edge finish options and dye fastness. As designers translate artwork into scalable stitch paths, the patch making process balances color, density, and edge clarity to preserve the artwork in embroidery patch manufacturing, while also optimizing for thread sheen, digitizing tolerances, and machine speeds, ensuring compatibility with multiple embroidery platforms. Along the way, client briefs for custom embroidered patches shape licensing, color matching, and branding guidelines, ensuring the final product is legible, durable, and ready for wear across seasons and fabrics, with quality checks guiding decisions before mass production, and clear proofs to reduce iterations, plus ongoing feedback loops and performance testing to ensure durability in real-world use for seasonal collections and catalog updates, and worldwide.
In other terms, the world of badge creation includes stitched emblems, decorative patches, and textile insignia that blend craftsmanship with scalable production. This framing aligns with the broader language of embroidery patch manufacturing, applique artistry, and brand adornment, highlighting the flow from concept, to digitized stitching, to finished attachments. Whether you call them embroidered insignia, decorative emblems, or patch embellishments, the core workflow remains the same: design, digitize, stitch, trim, back with backing, and verify durability.
Understanding Embroidered Patches: Design, Color, and Brand Impact
Embroidered patches offer a powerful way to tell a story, build brand identity, and celebrate teams. The design phase of embroidered patches must balance legibility at a distance with detail up close, so the motif, size, shape, and color palette support both function and aesthetics. Designers consider where the patch will be worn—jackets, hats, uniforms, or bags—and which fabrics it will be applied to, because substrate compatibility shapes the final look and durability. This is the core of the concept-to-production journey that shapes every embroidered patches project.
A well-defined patch design reduces back-and-forth during digitizing and minimizes costly rework in embroidery patch manufacturing. When clients request custom embroidered patches, licensing, color matching, and branding guidelines are resolved early, ensuring the patch making process stays smooth and predictable.
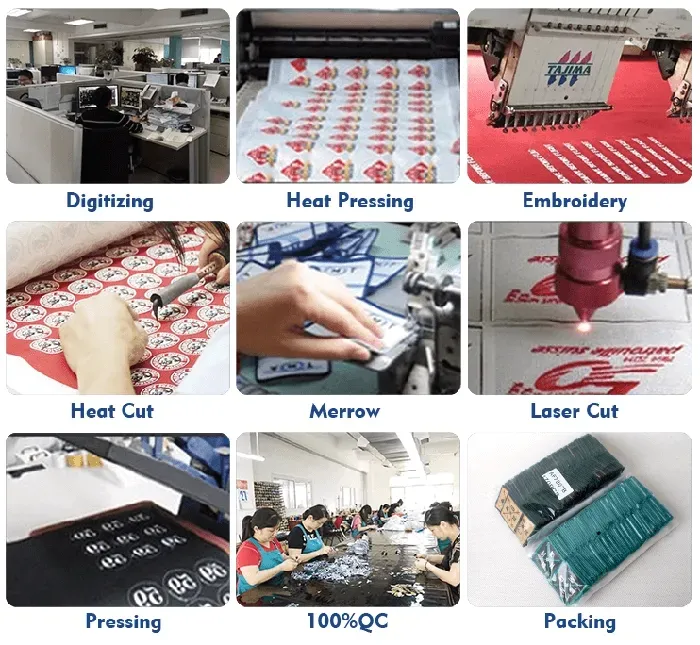
From Concept to Creation: The Patch Making Process
From concept to creation, the patch making process blends art and engineering. The guide from concept to creation covers motif selection, scale, shape, and color decisions, and notes how the patch can be used on different apparel. Designers envision the final badge and begin to map it into production files to maintain readability and impact across sizes. This phase is where the design becomes a reproducible object for embroidery patch manufacturing.
Digitizing translates the artwork into stitch paths, densities, and color files that embroidery machines can read. A strong digitizing job preserves the original art, ensures crisp edges, and minimizes stitch density in small areas. If you’re working with a manufacturer for custom embroidered patches, ask about their digitizing workflow, proofing, and software compatibility to avoid surprises in production.
Material Selection and Backing Options for Durability
Material selection and backing options determine the patch’s feel, durability, and attachment method. Fabric choices like twill, felt, or canvas impact drape and stiffness, while stabilizers guard against puckering during stitching and help the patch hold its shape after trimming. The backing—iron-on, sew-on, or Velcro—also influences how the patch will be attached to garments, bags, or gear.
Thread types matter too; color-matching artwork with rayon, polyester, or metallic threads changes sheen, texture, and cost. The patch embroidery design must harmonize with chosen thread and backing, because some color combinations read differently against certain fabrics. This step bridges design and manufacturing as early color decisions affect both aesthetics and production efficiency for custom embroidered patches.
Digitizing and Patch Embroidery Design: Turning Art into Stitch Paths
Digitizing and patch embroidery design are the bridge between art and production. The digitizing stage creates the stitch plans that drive embroidery machines, converting artwork into stitch types, densities, underlay, and color files that ensure legible edges and smooth coverage. Color management and underlay choices keep the patch readable at small sizes.
A well-executed patch embroidery design considers readability across sizes and fabrics, with a focus on controlling stitch counts and ensuring consistent color across batches. If you partner with a manufacturer for custom embroidered patches, discuss proofs, font rendering, and thread choices to minimize surprises in production and ensure a faithful translation of your design into embroidered patches.
Size, Shape, and Color: Customization for Versatility
Size, shape, and color drive patch versatility. Patches can be round, shield-shaped, or custom-cut to unique silhouettes, and the size influences legibility and cost. In practice, production teams optimize visibility from a distance while keeping tooling and cutting efficient for bulk orders, which directly ties to the patch making process in mass manufacturing.
Color matching is essential, especially for brand patches. Testing color palettes on the chosen fabric and backing helps prevent color drift after washing. Building a standard color library across products supports consistency in embroidery patch manufacturing and makes line extensions smoother for teams managing multiple SKUs.
Quality Control and Finishing in Embroidery Patch Manufacturing
Quality control, finishing, and care are the final gates to durability. Each patch is checked for color consistency, edge finish, and stitch integrity, ensuring branding guidelines stay intact through wear and washing. Finishing options like merrow edging, satin borders, or hot-cut edges influence the final texture and feel of embroidered patches in everyday use.
Ongoing care and wash testing ensure longevity, with attention to how heat, detergents, and laundering affect materials. In the broader field of embroidery patch manufacturing, ongoing QC and supplier certifications help you select partners who can scale while maintaining color integrity and finish across batches of embroidered patches.
Frequently Asked Questions
What are the main stages in the patch making process for embroidered patches?
The patch making process for embroidered patches typically includes concept and design, material selection and backing, digitizing, embroidery, trimming and edge finishing, backing application, and final quality control. Each stage influences durability, color accuracy, and overall appearance.
How does patch embroidery design affect readability and cost in embroidered patches?
A strong patch embroidery design balances legibility, scale, line weight, and color separation. Clear designs translate into efficient digitizing, smoother production, and fewer reworks, improving readability and controlling costs for custom embroidered patches.
What roles do backing, stabilizers, and thread choices play in embroidery patch manufacturing?
Backing and stabilizers keep fabric flat during stitching, while thread type and color affect sheen, durability, and cost. Selecting iron-on, sew-on, or Velcro backings, plus suitable stabilizers and threads, is central to embroidery patch manufacturing.
What is digitizing in the patch making process and why is it critical for patch embroidery design?
Digitizing converts artwork into stitch paths, densities, underlay, and color files. A good digitizing workflow preserves detail at patch size, ensures clean edges, and enables consistent color management across batches, which is essential for patch embroidery design.
How can buyers optimize cost and quality when ordering custom embroidered patches?
Provide a clear brief with size, shape, colors, and backing, request proofs and color swatches, and conduct wash tests. Standardizing backings and streamlining the patch making process helps reduce changeovers and deliver high-quality custom embroidered patches on time and within budget.
What finishing options and quality checks are common in embroidery patch manufacturing?
Common finishing includes merrow edging, satin borders, or hot-cut edges, followed by backing application and a thorough quality control check for color consistency, edge finish, and stitch integrity. This ensures durable, brand-accurate embroidered patches.
| Key Point | Summary |
|---|---|
| Introduction | Patches are more than decoration; they tell stories, build brand identity, and celebrate team spirit. The process blends art and engineering to turn a simple idea into a durable, wearable badge. |
| Design and Concept | Foundation of a patch: ensure legibility at distance; define motif, size, shape, and color palette; consider typical use and fabrics; translate artwork into scalable embroidery; a clean design reduces digitizing back‑and‑forth and licensing/branding considerations. |
| Material Selection and Backing Options | Choose fabrics (twill, felt, canvas) and stabilizers to affect durability and texture. Select backing (iron-on, sew-on, Velcro) and thread types (rayon, polyester, metallic) with color matching in mind; these choices impact appearance and cost. |
| Digitizing | Digitizing converts art into stitch plans: stitch types, densities, underlay, and color files. Emphasize readability, edge definition, and efficient stitch density; manage colors across batches and verify workflow with proofs. |
| From Design to Production | Production steps include stabilizing the fabric, embroidery, trimming/edge finishing, backing application, and quality control to ensure a uniform, professional look. |
| Production Steps (1–5) | 1) Stabilization 2) Embroidery 3) Trimming/Edge Finishing 4) Backing Application 5) Quality Control |
| Size, Shape, and Color | Patches can be round, shield-shaped, or custom-cut. Size affects legibility and cost; optimize for visibility while staying production-efficient. Color matching and a standard library help maintain consistency. |
| Custom Embroidered Patches | Used for branding or team identity. Provide a clear brief (size, shape, color, backing, licensing). Designers and digitizers can offer services; supply vector files and color guides; discuss lead times, minimums, and proofs. |
| Quality, Longevity, and Care | Well-made patches use colorfast thread and durable backing; design to resist fraying and withstand washing. Heavily heat-sensitive materials may require tougher fabrics and stabilizers. |
| Production Variants | Woven patches offer loom-based, lighter and more flexible detail with different texture than embroidery; shows how patch manufacturing adapts to design needs. |
| Trends and Practical Tips | Eco-friendly materials, certifications, proofs, color swatches, and wash tests help ensure sustainability and quality. Use standard backings, maintain version control, and lock down proofs before large runs. |
| Conclusion: Value of Understanding the Process | A concise view of the entire workflow from concept to finish, highlighting how design, materials, digitizing, and finishing come together to deliver patches that are visually compelling, durable, and on-brand. |