Embroidery on Fabric is a timeless craft that adds color, texture, and personality to everyday textiles. Whether you’re decorating a tote bag, upgrading a pillowcase, or personalizing a garment, embroidery on fabric can be incredibly rewarding for beginners. This guide covers the essential tools, materials, and fabric embroidery tools that every starter should know. You’ll learn how to choose the right fabric, threads, and needles, how to set up your workspace, and how to practice beginner embroidery stitches to build solid skills. With patient practice of hand embroidery techniques and the use of embroidery threads and stabilizers, you’ll unlock more complex stitches and creative possibilities.
Beyond the phrase embroidery on fabric, this textile needlework on cloth blends color and texture through stitching. For beginners, it’s common to refer to it as beginner embroidery stitches, focusing on simple motions that build confidence. A typical setup uses fabric embroidery tools, a hoop to keep fabric taut, and embroidery threads and stabilizers to prevent puckering. As your confidence grows, you’ll explore hand embroidery techniques, trying stitches that add texture, shading, and dimension. Whether you call it fabric art, cloth stitching, or needlework, the core remains planning, practice, and patience that translate to real, satisfying results.
1) Embroidery on Fabric: Getting Started for Beginners
Embroidery on Fabric opens a world of color, texture, and personalization for everyday textiles. For newcomers, choosing forgiving materials such as cotton or linen helps you learn basic hand embroidery techniques without fighting against a tough weave. Start with small projects like a tote bag accent or a pillow corner to build confidence while enjoying the tactile satisfaction of thread on fabric.
A simple setup makes all the difference. Gather the right fabric, a comfortable hoop, sharp needles, and a clean workspace with good lighting. As you practice, focus on foundational hand embroidery techniques and the beginner embroidery stitches that form the backbone of more complex designs. Keeping your materials organized and accessible helps you stay motivated as you grow your skills.
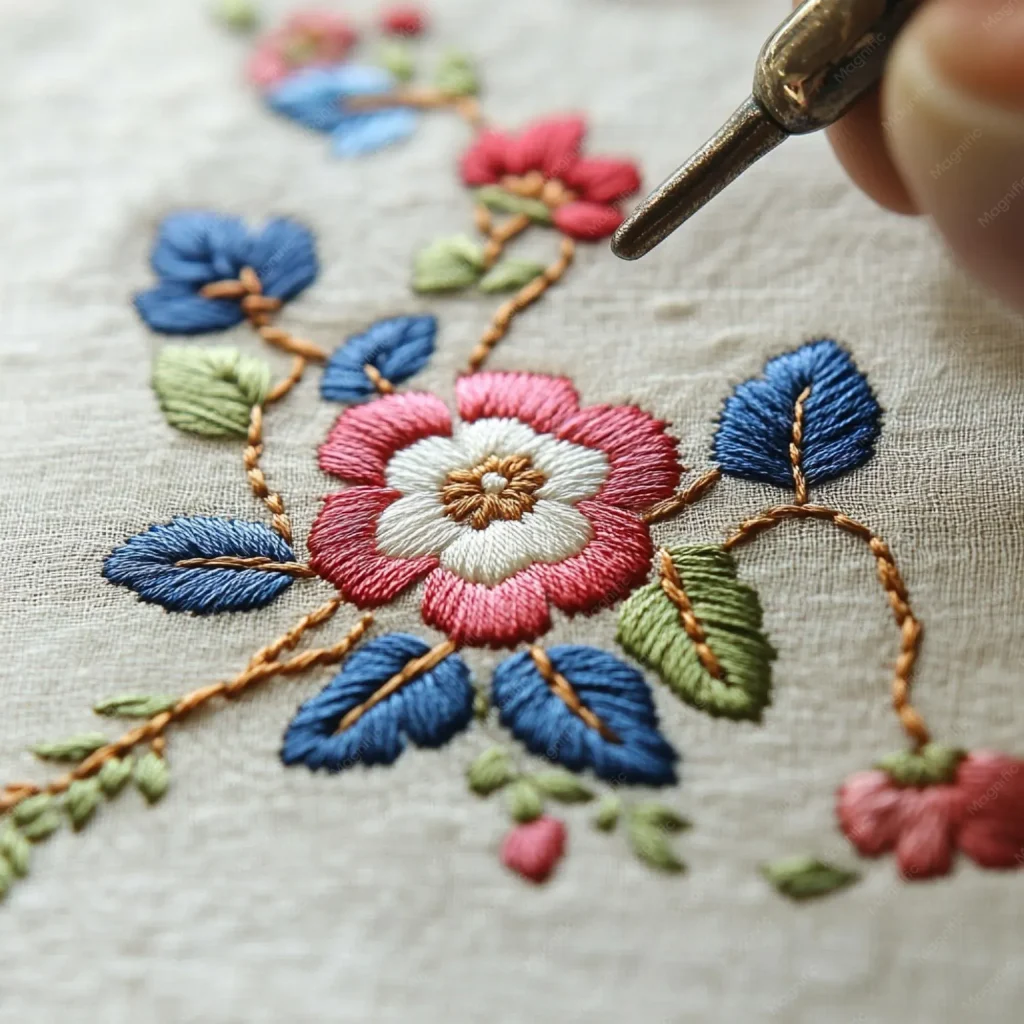
2) Essential Fabric Embroidery Tools Every Beginner Should Know
Having a curated set of fabric embroidery tools speeds up your progress and minimizes frustration. A sturdy embroidery hoop keeps fabric taut, reducing distortion and easing stitch control. Pair it with a sharp needle suitable for your fabric weight, plus a pair of fabric scissors for clean snips and precise thread management.
Beyond the basics, consider a marker or erasable pencil for pattern transfer, a needle threader if you need it, and a small pin cushion or magnetic tray to keep pins and needles organized. These tools support a smoother workflow while you practice the core techniques that underpin beginner embroidery stitches and help you convert simple sketches into neat, finished designs.
3) Mastering Beginner Embroidery Stitches for Solid Foundations
The core of any embroidery project lies in mastering a handful of beginner embroidery stitches. Start with the running stitch to outline shapes, then progress to the backstitch for continuous lines that resemble drawn outlines. These foundational stitches are the building blocks you’ll rely on as you create more complex patterns.
Next, practice the satin stitch for solid color fills, the chain stitch for decorative curves, and the French knot for small, textured accents. Working with consistent tension and stitch length will help you achieve smooth surfaces and balanced designs. As you gain confidence, you can combine stitches to add depth and dimension to your hand embroidery techniques.
4) Choosing Threads and Stabilizers: The Right Mix for Your Fabric Embroidery
The choice of threads and stabilizers profoundly affects the final look and durability of your project. For beginners, standard six-strand embroidery floss offers a versatile range of colors when separated into the number of strands you need. Brands like DMC or Anchor provide reliable options that work well with common fabrics.
Stabilizers prevent puckering and shifting, especially on lightweight fabrics. Tear-away and cut-away stabilizers serve different finishes, so selecting the right type for your project matters. Understanding how embroidery threads and stabilizers interact with your fabric helps you achieve clean edges and a secure stitching surface, laying a solid foundation for more complex work later.
5) Planning Your First Hand Embroidery Project: Sketch, Transfer, Stitch
Plan a small, manageable design to learn control over tension and stitch density. A simple motif like a single flower or leaf gives you space to practice beginner embroidery stitches while staying within a comfortable scale. Transferring the pattern to fabric with a washable marker keeps your lines light and easy to correct.
Think about color placement and how to layer stitches for depth. Transferring a basic pattern and breaking it into sections lets you practice technique gradually. As you work, document your process to track what worked well and where you’d like to improve—this habit accelerates your growth in hand embroidery techniques.
6) Finishing, Care, and Display to Extend Your Embroidered Pieces
Finishing touches are as important as the stitching itself. Secure threads on the backside with small knots or tiny stitches to prevent unraveling, then decide whether your piece will be a patch, a decorative hoop art, or sewn onto a garment. Matching thread color helps maintain a cohesive look across the project.
Care instructions preserve color and texture. Hand washing delicate pieces in cold water and air drying flat is a safe starting point, with gentler machine cycles suitable for sturdy fabrics and colorfast threads. Proper finishing and careful display—whether framed, framed under glass, or mounted on fabric—keeps your embroidery on fabric looking vibrant and durable for years to come.
Frequently Asked Questions
What is Embroidery on Fabric and why is it beginner-friendly?
Embroidery on Fabric is a timeless craft that lets you add color and texture to textiles. It is beginner-friendly because you can start with a small set of basic stitches and simple projects while gradually learning hand embroidery techniques. As you practice, you’ll gain confidence in choosing fabrics, tools, and threads.
Which beginner embroidery stitches should I learn first for Embroidery on Fabric?
Begin with five core beginner embroidery stitches for embroidery on fabric: running stitch, backstitch, satin stitch, chain stitch, and French knot. Practice on scrap fabric to learn tension and spacing, then mix stitches to outline shapes or fill areas using hand embroidery techniques.
How do I choose fabric, embroidery threads and stabilizers for Embroidery on Fabric?
Choose forgiving fabrics like cotton or linen for embroidery on fabric. For light or delicate fabrics, use a stabilizer such as tear-away or cut-away to prevent puckering. Select embroidery threads from brands like DMC or Anchor, using two to four strands depending on fabric weight; stabilize with the right combination for clean results.
What are the essential fabric embroidery tools for a beginner?
Core fabric embroidery tools include an embroidery hoop to keep fabric taut, sharp embroidery needles, a tapestry needle for finishing, sharp scissors, a threader if needed, a fabric marker, and a pin cushion or magnetic pin tray. These fabric embroidery tools support clean, accurate stitching.
How should I set up my workspace for hand embroidery techniques and Embroidery on Fabric?
Set up a simple, well-lit workspace with a comfortable chair and a flat surface. Use a hoop to keep fabric taut and practice on scrap fabric before your final piece. Plan designs on paper, transfer patterns if needed, and keep notes on thread colors and stitches to support your hand embroidery techniques.
What is a simple starter project for Embroidery on Fabric and how do I complete it?
Try a Simple Flower on a Swatch. Hoop the fabric, thread with two to four strands, outline the flower with a backstitch, fill petals with satin stitch, add a French knot center, and finish with a stem stitch for the stem. This starter project reinforces beginner embroidery stitches and hand embroidery techniques while producing a small, usable piece.
| Topic | Key Points |
|---|---|
| What is Embroidery on Fabric? | Timeless craft that adds color, texture, and personality to textiles; suitable for beginners and scalable to more complex projects; covers essential tools, materials, and techniques. |
| Tools, Materials, and Workspace Setup | Choose forgiving fabrics (cotton/linen); use stabilizers (tear-away or cut-away); select embroidery threads (DMC/Anchor); needles (size 7–9); a comfortable hoop, scissors, threader, markers; pin cushion; good lighting; comfortable workspace. |
| Choosing Fabric and Stabilizers | Cotton/linen provide a stable weave for easy stitching; stabilizers prevent puckering; choose tear-away or cut-away based on project and fabric; practice on plain weave fabric. |
| Threads, Needles, and Accessories | Embroidery floss (six strands) from brands like DMC/Anchor; typically use 2–4 strands for most projects; standard needles and hoops; threader, fabric marker, and scissors. |
| Understanding Basic Techniques: Beginner Stitches | Master running stitch, backstitch, satin stitch, chain stitch, and French knot; practice on swatches; combine stitches for outlines and color; build skills for more complex techniques. |
| Choosing Your First Project | Start small with simple designs (flower, leaf, or geometric); use lightweight fabric; sketch or transfer patterns; pace yourself to develop rhythm. |
| A Quick Starter Project: Simple Flower on a Swatch | Hoop fabric taut; thread needle with 2–4 strands; outline with backstitch; fill petals with satin stitch; add a French knot in the center; use stem stitch for a stem; trim threads; wash away marks; apply to projects like pillow covers or tote bags. |
| Care, Finishing, and Display | Secure back threads; sew onto final piece with matching thread if needed; back with backing fabric for displays; hand wash cold and air dry; test a small area for machine washing on delicate fabrics. |
| Common Mistakes and How to Fix Them | Tackle tension issues, uneven stitches, and puckering: tighten and rework; hoop fabric correctly; maintain consistent stitch length and angle; switch to sharper needles; use appropriate stabilizers to reduce puckering. |
| Practical Tips for Building Your Skills | Practice regularly; keep a color log; manage threads; use scraps for practice; document progress with photos. |
| Expanding Your Toolkit and Techniques | Experiment with looser weaves, metallic or variegated threads; explore multi-stitch patterns, shading, and combining embroidery with appliqué or quilting. |
Summary
Embroidery on Fabric is a versatile, accessible craft that invites beginners to learn, create, and enjoy the tactile satisfaction of thread and cloth. With the right fabric, tools, and materials, plus patient practice of beginner embroidery stitches, you’ll be able to produce charming, durable pieces that reflect your unique style. Start with a simple project, keep notes on what works, and gradually expand your toolkit and techniques as your confidence grows. The journey from a single line of thread to a finished embroidered design is a rewarding one—so pick a fabric, choose your threads, and begin your creative adventure today in the realm of Embroidery on Fabric.