DIY Embroidered Patches offer a playful way to personalize jackets, hats, bags, and more while learning a timeless craft. This friendly guide helps beginners start with simple patches and gradually tackle more intricate designs. You’ll discover the essential supplies, comfortable stitches, and tips to support durable results. Along the way you’ll learn how to choose projects, manage thread tension, and keep edges neat for everyday wear. Whether you’re embellishing gear for yourself or creating gifts, each patch builds confidence and pride.
Think of this as handmade fabric embellishment for garments and gear, where stitches turn plain material into personality. Start with the same core idea—transferring a design, selecting approachable stitches, and choosing a backing that keeps the patch secure—then explore friendly project ideas that fit small spaces. You’ll hear terms like fabric patches, textile ornamentation, and simple stitching techniques that align with playful, beginner projects, guiding you from a single motif to more complex scenes. With patience and practice, you’ll gain a confident, repeatable patch-making routine that yields durable, decorative results.
DIY Embroidered Patches: A Beginner-Friendly Guide
DIY Embroidered Patches offer a playful way to personalize jackets, hats, bags, and more while learning a timeless craft. These embroidered patches for beginners are a great starting point because you can begin with simple shapes and gradually tackle more complex designs.
In this guide you’ll learn what supplies to gather, how to choose stitches for patches, and how to pick backings that suit your project. It also covers how to sew patches from start to finish, so you can build a steady habit of turning fabric and thread into wearable art.
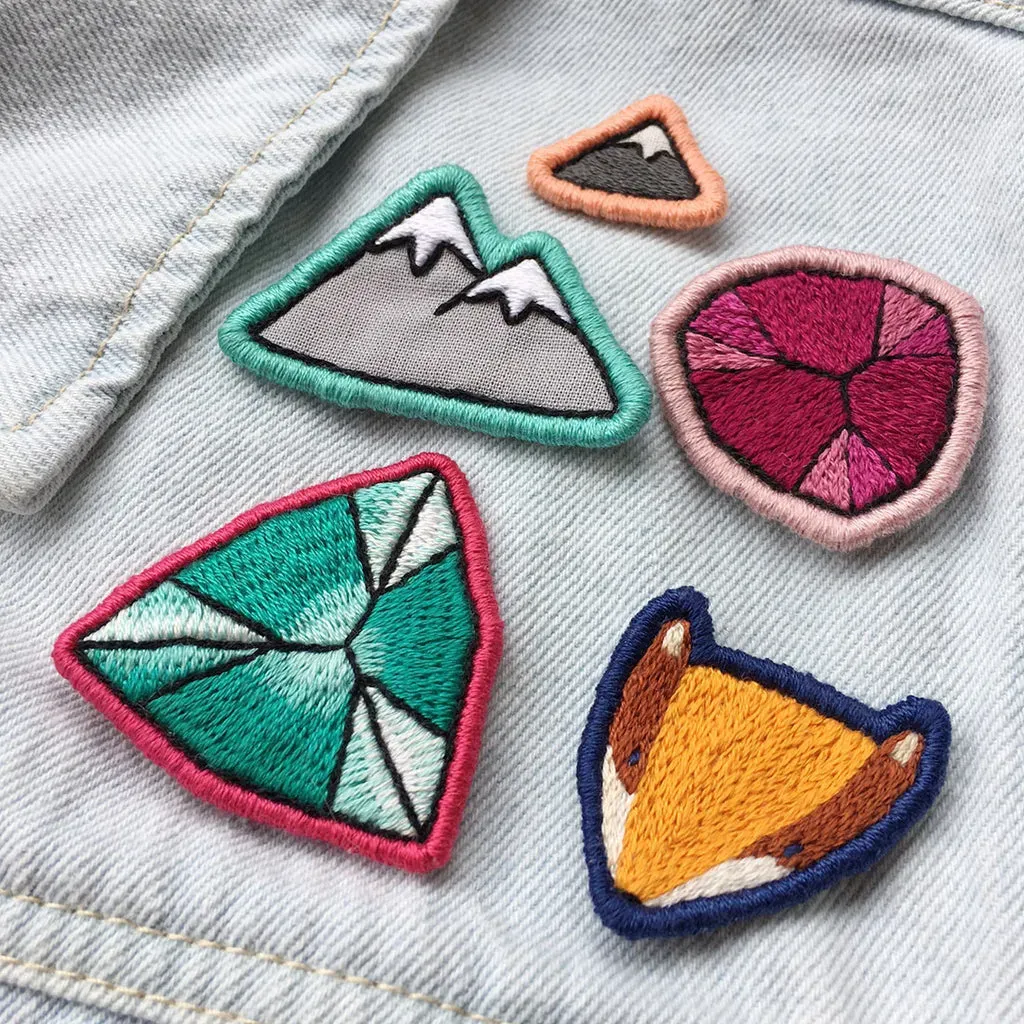
Patch Backing Types: Choosing Durability for Your Projects
Understanding patch backing types is essential for patch durability and how well a patch holds up on different fabrics. The right backing protects stitches during sewing and wear, whether you are working on denim, jersey, or canvas.
Common options include tear-away backing, stabilizer backing, iron-on backing, and sew-on backing. When you start, test a small patch on scrap fabric to see how the backing behaves with your chosen fabric.
Essential Patch Making Supplies List for Beginners
Essential patch making supplies list for beginners keeps things simple and affordable. A basic kit includes an embroidery needle set, embroidery floss, a fabric square for practice, and a light tear-away backing.
From there you can expand with a hoop, scissors, water-soluble fabric pen, tracing paper pattern, and other basics. As you gain experience you can explore metallic threads, printed fabrics, and stabilizers, but start with the core items on your patch making supplies list.
Mastering Embroidery Stitches for Patches
Mastering embroidery stitches for patches starts with a core set of techniques such as running stitch, backstitch, satin stitch, split stitch, and French knot. This collection of embroidery stitches for patches gives you the foundational tools for shaping outlines, fills, and subtle texture.
Practice each stitch on scraps to keep tension even and avoid puckering. As you grow, you will learn which stitches work best for different fabrics and patch sizes, emphasizing neat edges over speed.
Designing, Transferring, and Planning Your Patch Pattern
Designing, transferring, and planning your patch pattern helps keep the stitching enjoyable and the result polished. Start with a simple motif that fits the patch area and build from there.
Use tracing paper to sketch drafts, transfer outlines with a water-soluble pen, and secure the fabric in a hoop to keep it flat during work. For embroidered patches for beginners, keep designs simple and use a limited color palette to focus on stitch quality.
Finishing, Attaching, and Caring for DIY Patches
Finishing, attaching, and caring for your DIY patches ties the process together. Trim the backing, apply your chosen backing, and sew around the edge with a tight, tidy stitch for a crisp border.
Care for patches by washing on gentle cycles and air-drying when possible to preserve color and shape. With regular practice, you’ll refine your technique and develop a personal patch-making style that suits your fabric choices and stitching preferences.
Frequently Asked Questions
DIY Embroidered Patches for Beginners: what is included in a patch making supplies list?
DIY Embroidered Patches for beginners involve simple stitching on fabric to personalize items. A patch making supplies list typically includes an embroidery needle set, embroidery floss, fabric scraps, tear-away backing, an iron-on or sew-on backing, sharp scissors, a water-soluble pen, an embroidery hoop, and a simple pattern. As you gain experience, you can add metallic threads, stabilizers, and more complex tools.
How to sew patches: what are the essential embroidery stitches for patches for beginners?
To sew patches, secure the fabric in a hoop, transfer your design, and use beginner-friendly stitches. Essential embroidery stitches for patches include running stitch, backstitch, satin stitch, split stitch, and French knots. Focus on neat, even stitches and a clean edge to hold up under backing.
What patch backing types are best for DIY Embroidered Patches?
Backing types affect stitch security and wear. Common patch backing types are tear-away for easy removal, stabilizer for stretchy fabrics, iron-on backing for heat adhesion, and sew-on backing for a thread-only finish. Try a small test patch to see how each backing behaves with your fabric.
Design transfer tips for DIY Embroidered Patches: how do you transfer a pattern and what supplies help?
For design transfer, start with a simple motif and use a water-soluble pen or erasable pencil. Place the fabric in the hoop, secure the backing, and lightly circle key features to guide stitches. This aligns with a basic patch making supplies list that keeps things straightforward for beginners.
Step-by-step process for beginners: how to apply embroidery stitches for patches on a DIY Embroidered Patch?
Follow a basic workflow: prep fabric and backing, transfer the design, hoop securely, outline with backstitch or running stitch, fill large areas with satin stitch or split stitch, add details with French knots, trim backing, apply the chosen backing, and press lightly from the back.
Finishing and applying DIY Embroidered Patches: what are the key steps and considerations for patch backing types?
Choose a backing type suitable for your garment; tear-away for fabric stability, iron-on for heat-activated adhesion, or sew-on if you want no glue. Finish by sewing or ironing according to backing instructions, then sew a tight border around the patch to secure it.
| Topic | Key Points |
|---|---|
| Introduction | DIY Embroidered Patches offer a playful way to personalize jackets, hats, bags, and more, while teaching a timeless craft; beginner-friendly guide covers supplies, stitches, backings, and turning fabric into durable patches. |
| Starter Approach | Start with simple patches and gradually tackle more complex designs to build skills and confidence. |
| Needed Supplies | Basic kit ideas: embroidery needle set (sizes 7–9); embroidery floss in several colors plus neutral thread; fabric square; tear-away backing; iron-on or sew-on backing; sharp scissors; water-soluble pen; hoop; simple pattern. As you gain experience, you can add metallic threads, printed fabrics, and stabilizers. |
| Essential Stitches | Key stitches: running stitch, backstitch, satin stitch, split stitch, French knot. Practice on scraps before applying to patches to build consistency and edge control. |
| Backings & How to Choose | Backings: tear-away, stabilizer, iron-on, and sew-on; test a patch to see how the backing behaves with your fabric; beginners often start with tear-away for forgiveness. |
| Pattern Design & Transfer | Start with a simple motif; transfer outline using a water-soluble pen; hoop fabric and secure backing; lightly circle important features to guide stitches. |
| Step-by-Step Process | Ten-step workflow: prepare fabric and backing, transfer design, hoop, outline border with chosen stitch, fill larger areas, add details, trim backing, apply backing, press, and sew or finish around the edge. |
| Tips & Mistakes to Avoid | Keep stitches even and not too tight; use a hoop; trim backing cleanly; wash gently; avoid skipping stabilizers on stretchy fabrics; re-tension if patches pucker. |
| Creative Ideas & Finishing Touches | Experiment with combining shapes, contrasting colors, borders, and decorative stitches; consider beads or appliqué for unique patches; maintain a cohesive line with uniform patch sizes and color palettes. |
Summary
DIY Embroidered Patches invite you to turn fabric and thread into wearable art, blending straightforward stitches with personal style. This descriptive overview covers beginner-friendly supplies, essential stitches, backing options, pattern transfer, and a practical step-by-step workflow, helping you grow from a first patch to a confident creator. With practice, you will develop your preferred fabrics, colors, and stitches, creating durable patches you can wear or gift. DIY Embroidered Patches are approachable crafts that reward patience, consistency, and imagination, turning simple materials into lasting accents.